前言:本文用于教学,面向初学者,使用标准apache下hadoop,生产环境如果没有定制需求可以直接使用Cloudera版本,但是本文对了解hadoop标准架构非常有帮助。从搭建环境到动手完成你的第一个MapReduce任务(需要有简单JavaSE编程基础)
Hadoop介绍和环境搭建
1. 什么是Hadoop
-
解决什么问题
- Apache Hadoop is a framework for running applications on large cluster built of commodity hardware. The Hadoop framework transparently provides applications both reliability and data motion. Hadoop implements a computational paradigm named Map/Reduce, where the application is divided into many small fragments of work, each of which may be executed or re-executed on any node in the cluster. In addition, it provides a distributed file system (HDFS) that stores data on the compute nodes, providing very high aggregate bandwidth across the cluster. Both MapReduce and the Hadoop Distributed File System are designed so that node failures are automatically handled by the framework.
-
解决不了什么问题
-
大数据处理的思路
-
Hadoop包含哪些组件 相关项目
- HDFS集群::负责海量数据的存储,集群中的角色主要有 NameNode/DataNode/SecondaryNameNode。
- YARN集群:负责海量数据运算时的资源调度,集群中的角色主要有 ResourceManager /NodeManager
- MapReduce:它其实是一个应用程序开发包。
2. Hadoop 2.6.4安装和启动
1. VMware - centos 6.4 /
2. 设置Linux
-
设置管理员权限
$suvi /etc/sudoers增加root 用户 -
设置网络
setup -
修改本机名称
sudo vi /etc/sysconfig/networksudo hostname hadoop -
(Centos 自带)安装net-tool
sudo apt install net-tools -
(Centos 自带)安装 ssh
sudo apt install openssh-server -
开机启动不开启 X11图形界面
vi /etc/inittab修改为:3 -
安装JDK
-
上传到服务器使用SFTP 登录,
put 命令 -
解压文件
-
设置环境变量
sudo vi /etc/profileexport JAVA_HOME=/home/hadoop/app/jdkxxx export JAVA_HOME=$PATH:$JAVA_HOME/bin -
source /etc/profile
-
-
免密指令
cd ./sshssh-keygen -t rsascp centos_rsa.pub hadoop@centos1:~/.ssh拷贝到其他node的ssh文件夹下,如果是同一台电脑直接跳过该步骤cat centos_rsa.pub >> authorized_keyschmod 600 authorized_keys
问题:
1. 频繁掉线 ```$ sudo gedit /etc/network/interfaces``` lcp-echo-failure次数设为一个较大的数值就行了,默认好像是4,改成40就好了。
3. 安装Hadoop
-
上传hadoop.tar.gz 到服务器,解压
-
修改
etc/hadoop/hadoop-env.shJAVA_HOME写死为java安装路径/home/hadoop/app/jdk1.8.0_60 -
修改
core-site.xml<!-- 指定HADOOP所使用的文件系统schema(URI),HDFS(NameNode)的地址 --> <property> <name>fs.defaultFS</name> <value>hdfs://centos1:9000</value> </property> <!-- 指定hadoop运行时产生文件的存储目录 --> <property> <name>hadoop.tmp.dir</name> <value>/home/hadoop/hadoop-2.6.5/tmp</value> </property> -
修改
hdfs-site.xml<!-- 指定HDFS副本的数量 --> <property> <name>dfs.replication</name> <value>1</value> </property> -
mv mapred-site.xml.template mapred-site.xml<!-- 指定mr运行在yarn上 --> <property> <name>mapreduce.framework.name</name> <value>yarn</value> </property> -
修改
yarn-site.xml<!-- 指定YARN的老大(ResourceManager)的地址 --> <property> <name>yarn.resourcemanager.hostname</name> <value>centos1</value> </property> <!-- reducer获取数据的方式 --> <property> <name>yarn.nodemanager.aux-services</name> <value>mapreduce_shuffle</value> </property> -
开启hadoop
- 查看防火墙
sudo service iptables status - 关闭防火墙
sudo service iptables stop - 关闭默认启动
sudo chkconfig iptables --listsudo chkconfig iptables off hdfs namenode -format格式化namenode- 增加
hadoop/sbin到环境变量中 start-dfs.sh- 查看进程
jps - 启动
start-yarn.sh启动slave中的集群 - 本地打开
IP:50070
- 查看防火墙
-
在虚拟机上传文件
hadoop fs -put yelp_dataset/* /yelp_data
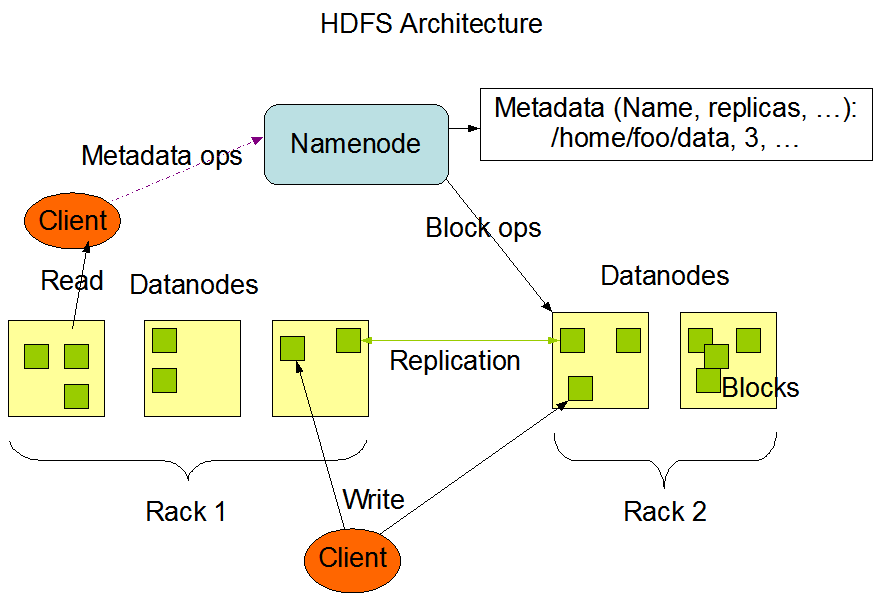
HDFS(The Hadoop Distributed File System)
HDFS是一个高度容错性的系统,适合部署在廉价的机器上。HDFS采用master/slave架构。一个HDFS集群是由一个Namenode和一定数目的Datanodes组成。Namenode是一个中心服务器,负责管理文件系统的名字空间(namespace)以及客户端对文件的访问。集群中的Datanode一般是一个节点一个,负责管理它所在节点上的存储。架构如下图:
基本概念
1. The File System Namespace
HDFS supports a traditional hierarchical file organization. A user or an application can create directories and store files inside these directories. The file system namespace hierarchy is similar to most other existing file systems; one can create and remove files, move a file from one directory to another, or rename a file. HDFS supports user quotas and access permissions. HDFS does not support hard links or soft links. However, the HDFS architecture does not preclude implementing these features.HDFS支持传统分层文件组织
2. Data Replication
HDFS is designed to reliably store very large files across machines in a large cluster. It stores each file as a sequence of blocks. The blocks of a file are replicated for fault tolerance. The block size and replication factor are configurable per file.
HDFS 被设计用来在大的主机集群中可靠地保存数据。提高容错(fault tolerance)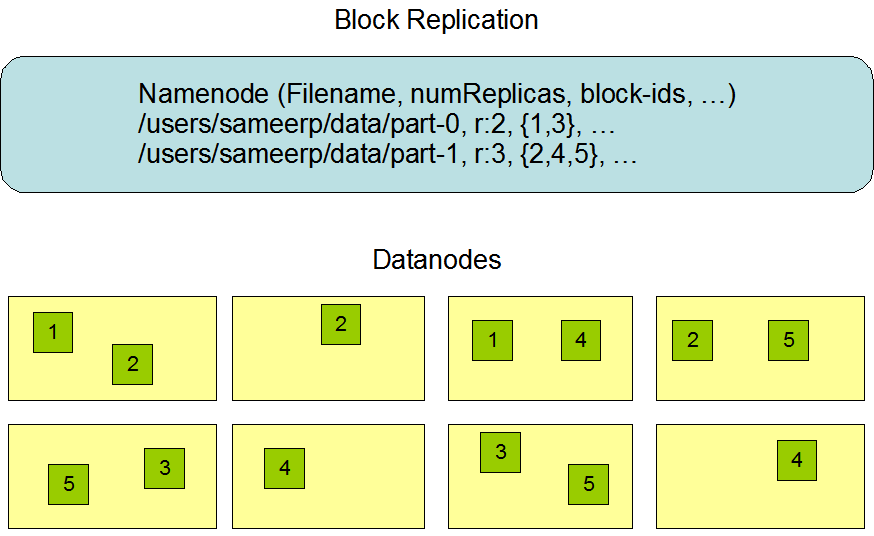
3. The Persistence of File System Metadata
The HDFS namespace is stored by the NameNode. The NameNode uses a transaction log called the EditLog to persistently record every change that occurs to file system metadata. For example, creating a new file in HDFS causes the NameNode to insert a record into the EditLog indicating this. Similarly, changing the replication factor of a file causes a new record to be inserted into the EditLog. The NameNode uses a file in its local host OS file system to store the EditLog. The entire file system namespace, including the mapping of blocks to files and file system properties, is stored in a file called the FsImage. The FsImage is stored as a file in the NameNode’s local file system too.
4. The Communication Protocols
All HDFS communication protocols are layered on top of the TCP/IP protocol. A client establishes a connection to a configurable TCP port on the NameNode machine. It talks the ClientProtocol with the NameNode. The DataNodes talk to the NameNode using the DataNode Protocol. A Remote Procedure Call (RPC) abstraction wraps both the Client Protocol and the DataNode Protocol. By design, the NameNode never initiates any RPCs. Instead, it only responds to RPC requests issued by DataNodes or clients.
5. Data Organization
Data Blocks
HDFS is designed to support very large files. Applications that are compatible with HDFS are those that deal with large data sets. These applications write their data only once but they read it one or more times and require these reads to be satisfied at streaming speeds. HDFS supports write-once-read-many semantics on files. A typical block size used by HDFS is 128 MB. Thus, an HDFS file is chopped up into 128 MB chunks, and if possible, each chunk will reside on a different DataNode.
Replication Pipelining
When a client is writing data to an HDFS file with a replication factor of three, the NameNode retrieves a list of DataNodes using a replication target choosing algorithm. This list contains the DataNodes that will host a replica of that block. The client then writes to the first DataNode. The first DataNode starts receiving the data in portions, writes each portion to its local repository and transfers that portion to the second DataNode in the list. The second DataNode, in turn starts receiving each portion of the data block, writes that portion to its repository and then flushes that portion to the third DataNode. Finally, the third DataNode writes the data to its local repository. Thus, a DataNode can be receiving data from the previous one in the pipeline and at the same time forwarding data to the next one in the pipeline. Thus, the data is pipelined from one DataNode to the next.
6. Accessibility
| Action | Command |
|---|---|
Create a directory named /foodir |
bin/hadoop dfs -mkdir /foodir |
Remove a directory named /foodir |
bin/hadoop fs -rm -R /foodir |
View the contents of a file named /foodir/myfile.txt |
bin/hadoop dfs -cat /foodir/myfile.txt |
- DFSAdmin
| Action | Command |
|---|---|
| Put the cluster in Safemode | bin/hdfs dfsadmin -safemode enter |
| Generate a list of DataNodes | bin/hdfs dfsadmin -report |
| Recommission or decommission DataNode(s) | bin/hdfs dfsadmin -refreshNodes |
-
Browser Interface
A typical HDFS install configures a web server to expose the HDFS namespace through a configurable TCP port. This allows a user to navigate the HDFS namespace and view the contents of its files using a web browser.
原理介绍
This document is a starting point for users working with Hadoop Distributed File System (HDFS) either as a part of a Hadoop cluster or as a stand-alone general purpose distributed file system. While HDFS is designed to “just work” in many environments, a working knowledge of HDFS helps greatly with configuration improvements and diagnostics on a specific cluster.
1. NameNode元数据工作机制
支撑节点
-
Secondary NameNode: performs periodic checkpoints of the namespace and helps keep the size of file containing log of HDFS modifications within certain limits at the NameNode.
- Checkpoint node: performs periodic checkpoints of the namespace and helps minimize the size of the log stored at the NameNode containing changes to the HDFS. Replaces the role previously filled by the Secondary NameNode, though is not yet battle hardened. The NameNode allows multiple Checkpoint nodes simultaneously, as long as there are no Backup nodes registered with the system.
- Backup node: An extension to the Checkpoint node. In addition to checkpointing it also receives a stream of edits from the NameNode and maintains its own in-memory copy of the namespace, which is always in sync with the active NameNode namespace state. Only one Backup node may be registered with the NameNode at once.
默认设置
dfs.namenode.checkpoint.period, set to 1 hour by default, specifies the maximum delay between two consecutive checkpointsdfs.namenode.checkpoint.txns, set to 1 million by default, defines the number of uncheckpointed transactions on the NameNode which will force an urgent checkpoint, even if the checkpoint period has not been reached.
Namenode在内存中保存着整个文件系统的名字空间和文件数据块映射(Blockmap)的映像。这个关键的元数据结构设计得很紧凑,因而一个有4G内存的Namenode足够支撑大量的文件和目录。当Namenode启动时,它从硬盘中读取Editlog和FsImage,将所有Editlog中的事务作用在内存中的FsImage上,并将这个新版本的FsImage从内存中保存到本地磁盘上,然后删除旧的Editlog,因为这个旧的Editlog的事务都已经作用在FsImage上了。这个过程称为一个检查点(checkpoint)。
The NameNode keeps an image of the entire file system namespace and file Blockmap in memory. When the NameNode starts up, or a checkpoint is triggered by a configurable threshold, it reads the FsImage and EditLog from disk, applies all the transactions from the EditLog to the in-memory representation of the FsImage, and flushes out this new version into a new FsImage on disk. It can then truncate the old EditLog because its transactions have been applied to the persistent FsImage. This process is called a checkpoint. The purpose of a checkpoint is to make sure that HDFS has a consistent view of the file system metadata by taking a snapshot of the file system metadata and saving it to FsImage. Even though it is efficient to read a FsImage, it is not efficient to make incremental edits directly to a FsImage. Instead of modifying FsImage for each edit, we persist the edits in the Editlog. During the checkpoint the changes from Editlog are applied to the FsImage. A checkpoint can be triggered at a given time interval (dfs.namenode.checkpoint.period) expressed in seconds, or after a given number of filesystem transactions have accumulated (dfs.namenode.checkpoint.txns). If both of these properties are set, the first threshold to be reached triggers a checkpoint.
2. NameNode和DataNode工作流程
写入时先由NameNode读取配置文件对目标文件进行切割多分block,此处没有文件传输。然后生成一个Metadata来保存文件和多个block之间的关系,以及一个block保存在哪些DataNode中。然后回馈给客户端,此时客户端上传数据时把对应的block发送给对应的DataNode,上传过程请参考Data Organization
3. HDFS的Java客户端编写
提前引入对应的Jar包
使用Configuration需要有core-site.xml和hdfs-site.xml两个配置文件
$scp hadoop@centos1:/home/hadoop/app/hadoop-2.6.5/etc/hadoop/core-site.xml Desktop/core-site.xml
或者在设置FileSystem对象时标明对应的FS实例名称
conf.set("fs.defaultFS", "hdfs://centos1:9000");
和core-site.xml中的名称应该一致。
上传
/**
     * 本地文件上传至 HDFS
     *
     * @param srcFile 源文件 路径
     * @param destPath hdfs路径
     */
	public static void copyFileToHDFS(String srcFile,String destPath)throws Exception{

		String url = "hdfs://172.16.204.100:9000";

		FileInputStream fis=new FileInputStream(new File(srcFile));//读取本地文件
        Configuration config=new Configuration();
        config.set("fs.defaultFS",url); //也可以,直接get(config)
        FileSystem fs=FileSystem.get(config);
        OutputStream os=fs.create(new Path(url+destPath));
        //copy
        IOUtils.copyBytes(fis, os, 4096, true);
        System.out.println("上传完成...");
        fs.close();
    }
问题:
Permission denied: user=wxkmac, access=WRITE, inode="/":hadoop:supergroup:drwxr-xr-x
需要把用户改为hadoop才能符合权限,设置run as - run configuration- arguments-vm arguments
增加-DHADOOP_USER_NAME=hadoop
也可以修改hdfs中的文件夹权限,也可以在FileSystem.get()中使用带有用户名的重载方法
FileSystem fs=FileSystem.get(URI.create("url"),config,"hadoop");
下载
/**
     * 从 HDFS 下载文件到本地
     *
     * @param srcFile HDFS文件路径
     * @param destPath 本地路径
     */
    public static void getFile(String srcFile,String destPath)throws Exception {
        //hdfs文件 地址
        String file=HDFSUri+srcFile;
        Configuration config=new Configuration();
        //构建FileSystem
        FileSystem fs = FileSystem.get(URI.create(file),config);
        //读取文件
        InputStream is=fs.open(new Path(file));
        IOUtils.copyBytes(is, new FileOutputStream(new File(destPath)),2048, true);//保存到本地  最后 关闭输入输出流
        System.out.println("下载完成...");
        fs.close();
    }
4. FileSystem设计思想
通过配置文件访问不同类型的文件系统,可以在src中查看FileSystem的子类。
当我们使用hdfs的配置时,返回的是DistributedFileSystem实例
这些实例在与远程服务器进行文件IO时,需要借助RPC方案实现。Hadoop中实现了这个方案。
5. RPC实现机制和应用实例
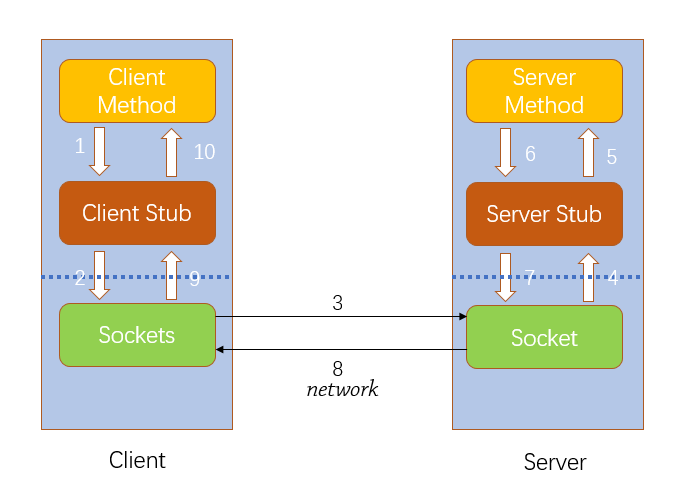
同其他RPC框架一样,Hadoop RPC分为四个部分:
(1)序列化层:Clent与Server端通信传递的信息采用了Hadoop里提供的序列化类或自定义的Writable类型;
(2)函数调用层:Hadoop RPC通过动态代理以及java反射实现函数调用;
(3)网络传输层:Hadoop RPC采用了基于TCP/IP的socket机制;
(4)服务器端框架层:RPC Server利用java NIO以及采用了事件驱动的I/O模型,提高RPC Server的并发处理能力;
Hadoop RPC在整个Hadoop中应用非常广泛,Client、DataNode、NameNode之间的通讯全靠它了。例如:我们平时操作HDFS的时候,使用的是FileSystem类,它的内部有个DFSClient对象,这个对象负责与NameNode打交道。在运行时,DFSClient在本地创建一个NameNode的代理,然后就操作这个代理,这个代理就会通过网络,远程调用到NameNode的方法,也能返回值。
//定义协议,客户端和服务端都要有
package com.zippowxk.rpc;

public interface MyBizable {
    long versionID = 1L;//该字段必须要有,不然会报java.lang.NoSuchFieldException: versionID异常
    public String doSomething(String str);
}
server端
package com.zippowxk.rpc;

import org.apache.hadoop.conf.Configuration;
import org.apache.hadoop.ipc.RPC;
import org.apache.hadoop.ipc.Server;

public class RPCServer implements MyBizable {

    @Override
    public String doSomething(String str) {
        return str;
    }
    /**
     * @param args
     * @throws Exception
     * @throws
     */
    public static void main(String[] args) throws  Exception {
        Server server = new RPC.Builder(new Configuration())
        .setProtocol(MyBizable.class)
        .setInstance(new RPCServer())
        .setBindAddress("192.168.8.100")
        .setPort(8077)
        .build();
        server.start();
    }

}
client端
package com.zippowxk.rpc;

import java.net.InetSocketAddress;

import org.apache.hadoop.conf.Configuration;
import org.apache.hadoop.ipc.RPC;

public class RPCClient {

    /**
     * @param args
     * @throws Exception
     */
    public static void main(String[] args) throws Exception {
        // TODO Auto-generated method stub
        MyBizable proxy = RPC.getProxy(MyBizable.class, 1L,new InetSocketAddress("192.168.8.100", 8077) , new Configuration());
        String result = proxy.doSomething("服务端");
        System.out.println(result);
        RPC.stopProxy(proxy);
    }
}
6. hadoop下载源码分析
主要涉及类是:
DistributedFileSystem open()
FSDataInputStream  read()
DFSInputStream read();
核心方法:
//DFSInputStream.java
public int read(long position, byte[] buffer, int offset, int length)
    throws IOException {
    // sanity checks
    dfsClient.checkOpen();
    if (closed) {
      throw new IOException("Stream closed");
    }
    failures = 0;
    long filelen = getFileLength();
    if ((position < 0) || (position >= filelen)) {
      return -1;
    }
    int realLen = length;
    if ((position + length) > filelen) {
      realLen = (int)(filelen - position);
    }

    // determine the block and byte range within the block
    // corresponding to position and realLen
    List<LocatedBlock> blockRange = getBlockRange(position, realLen);
    int remaining = realLen;
    Map<ExtendedBlock,Set<DatanodeInfo>> corruptedBlockMap
      = new HashMap<ExtendedBlock, Set<DatanodeInfo>>();
    for (LocatedBlock blk : blockRange) {
      long targetStart = position - blk.getStartOffset();
      long bytesToRead = Math.min(remaining, blk.getBlockSize() - targetStart);
      try {
        if (dfsClient.isHedgedReadsEnabled()) {
          hedgedFetchBlockByteRange(blk, targetStart, targetStart + bytesToRead
              - 1, buffer, offset, corruptedBlockMap);
        } else {
          fetchBlockByteRange(blk, targetStart, targetStart + bytesToRead - 1,
              buffer, offset, corruptedBlockMap);
        }
      } finally {
        // Check and report if any block replicas are corrupted.
        // BlockMissingException may be caught if all block replicas are
        // corrupted.
        reportCheckSumFailure(corruptedBlockMap, blk.getLocations().length);
      }

      remaining -= bytesToRead;
      position += bytesToRead;
      offset += bytesToRead;
    }
    assert remaining == 0 : "Wrong number of bytes read.";
    if (dfsClient.stats != null) {
      dfsClient.stats.incrementBytesRead(realLen);
    }
    return realLen;
  }
YARN
The ResourceManager and the NodeManager form the data-computation framework. The ResourceManager is the ultimate authority that arbitrates resources among all the applications in the system. The NodeManager is the per-machine framework agent who is responsible for containers, monitoring their resource usage (cpu, memory, disk, network) and reporting the same to the ResourceManager/Scheduler.
The per-application ApplicationMaster is, in effect, a framework specific library and is tasked with negotiating resources from the ResourceManager and working with the NodeManager(s) to execute and monitor the tasks.
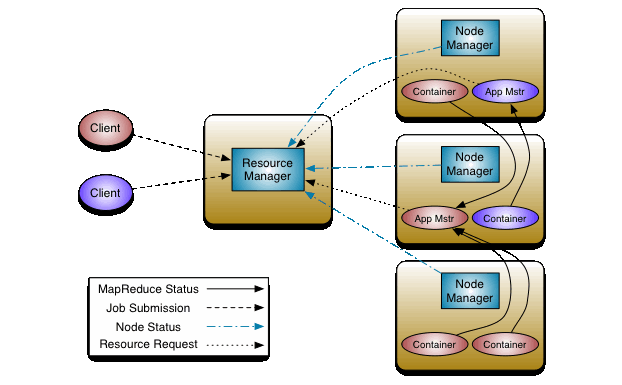
核心组件 ResourceManager,NodeManager
工作流程
-
client 提交 job,首先找 ResourceManager(ApplicationsManager)分配资源,同时将 jar 包默认拷贝10 份到 hdfs。
-
ResourceManager 指 定 一 个 NodeManager 开 启 一 个 container , 在 Container 中 运 行 一 个ApplicationMaster 来管理这个应用程序。
-
ApplicationMaster 会计算此个应用所需资源,向 ResourceManager(ResourceScheduler)申请资源。
-
ResourceManager 会分配资源,在 NodeManager上开启不同的 container,在container中来运行 map任务或者 reduce 任务
-
当所有的 task 都执行完了,ApplicationMaster会将结果反馈给客户端,所有工作执行完成之后,ApplicationMaster 就会自行关闭。
-
如果某个 map 任务或者 reduce 任务失败,ApplicationMaster会重新申请新的 container 来执行这个task。
MapReduce
概念介绍
Prerequisites
Ensure that Hadoop is installed, configured and is running.
Overview
Hadoop MapReduce is a software framework for easily writing applications which process vast amounts of data (multi-terabyte data-sets) in-parallel on large clusters (thousands of nodes) of commodity hardware in a reliable, fault-tolerant manner.
A MapReduce job usually splits the input data-set into independent chunks which are processed by the map tasks in a completely parallel manner. The framework sorts the outputs of the maps, which are then input to the reduce tasks. Typically both the input and the output of the job are stored in a file-system. The framework takes care of scheduling tasks, monitoring them and re-executes the failed tasks.
Minimally, applications specify the input/output locations and supply map and reduce functions via implementations of appropriate interfaces and/or abstract-classes. These, and other job parameters, comprise the job configuration.
The Hadoop job client then submits the job (jar/executable etc.) and configuration to the ResourceManager which then assumes the responsibility of distributing the software/configuration to the slaves, scheduling tasks and monitoring them, providing status and diagnostic information to the job-client.
Inputs and Outputs
The MapReduce framework operates exclusively on <key, value> pairs, that is, the framework views the input to the job as a set of <key, value> pairs and produces a set of <key, value> pairs as the output of the job, conceivably of different types.
The key and value classes have to be serializable by the framework and hence need to implement the Writable interface. Additionally, the key classes have to implement the WritableComparable interface to facilitate sorting by the framework.
nput and Output types of a MapReduce job:
(input) <k1, v1> -> map -> <k2, v2> -> combine -> <k2, v2> -> reduce -> <k3, v3> (output)
WordCount示例
import java.io.IOException;
import java.util.StringTokenizer;

import org.apache.hadoop.conf.Configuration;
import org.apache.hadoop.fs.Path;
import org.apache.hadoop.io.IntWritable;
import org.apache.hadoop.io.Text;
import org.apache.hadoop.mapreduce.Job;
import org.apache.hadoop.mapreduce.Mapper;
import org.apache.hadoop.mapreduce.Reducer;
import org.apache.hadoop.mapreduce.lib.input.FileInputFormat;
import org.apache.hadoop.mapreduce.lib.output.FileOutputFormat;

public class WordCount {

  public static class TokenizerMapper
       extends Mapper<Object, Text, Text, IntWritable>{

    private final static IntWritable one = new IntWritable(1);
    private Text word = new Text();

    public void map(Object key, Text value, Context context
                    ) throws IOException, InterruptedException {
      StringTokenizer itr = new StringTokenizer(value.toString());
      while (itr.hasMoreTokens()) {
        word.set(itr.nextToken());
        context.write(word, one);
      }
    }
  }

  public static class IntSumReducer
       extends Reducer<Text,IntWritable,Text,IntWritable> {
    private IntWritable result = new IntWritable();

    public void reduce(Text key, Iterable<IntWritable> values,
                       Context context
                       ) throws IOException, InterruptedException {
      int sum = 0;
      for (IntWritable val : values) {
        sum += val.get();
      }
      result.set(sum);
      context.write(key, result);
    }
  }

  public static void main(String[] args) throws Exception {
    Configuration conf = new Configuration();
    Job job = Job.getInstance(conf, "word count");
    job.setJarByClass(WordCount.class);
    job.setMapperClass(TokenizerMapper.class);
    job.setCombinerClass(IntSumReducer.class);
    job.setReducerClass(IntSumReducer.class);
    job.setOutputKeyClass(Text.class);
    job.setOutputValueClass(IntWritable.class);
    FileInputFormat.addInputPath(job, new Path(args[0]));
    FileOutputFormat.setOutputPath(job, new Path(args[1]));
    System.exit(job.waitForCompletion(true) ? 0 : 1);
  }
}
设置环境变量,为了可以调用hadoop命令
export JAVA_HOME=/usr/java/default
export PATH=${JAVA_HOME}/bin:${PATH}
export HADOOP_CLASSPATH=${JAVA_HOME}/lib/tools.jar
编译 WordCount.java 并打成jar包:
命令可以使用:
$ bin/hadoop com.sun.tools.javac.Main WordCount.java
$ jar cf wc.jar WordCount*.class
准备好输入数据
$ bin/hadoop fs -ls /user/joe/wordcount/input/
/user/joe/wordcount/input/file01
/user/joe/wordcount/input/file02

$ bin/hadoop fs -cat /user/joe/wordcount/input/file01
Hello World Bye World

$ bin/hadoop fs -cat /user/joe/wordcount/input/file02
Hello Hadoop Goodbye Hadoop
运行hadoop jar 命令:
第一个参数为jar包,第二个是类名,第三个是输入路径 第四个是输出路径
$ bin/hadoop jar wc.jar WordCount /user/joe/wordcount/input /user/joe/wordcount/output
如果一切正常,最终在输出文件中查看计算结果
$ bin/hadoop fs -cat /user/joe/wordcount/output
多个job提交
//先提交job_one执行
boolean one_result = job_one.waitForCompletion(true);
if(one_result){
	System.exit(job_tow.waitForCompletion(true)?0:1);
}
HA高可用架构
在Hadoop中,无论是HDFS,还是YARN,都存在一个问题,因为HDFS使用NameNode管理众多的DataNode节点,YARN使用ResourceManager管理系统的资源分配。所以假设NN节点或者是RM节点出现故障,都会导致整个集群不能正常使用,为了解决问题Hadoop针对NN以及RM引入了 支持Active/StandBy 模式的HA架构。
正常情况下对于NN以及RM,分别仅仅会有一个Active节点,其它节点为Standby,Active节点负责对外提供服务,当Active的节点因为异常不能对外提供服务时,standby节点会转化为Active节点,继续提供服务。
应用场景分析:
Zookeeper帮助Hadoop解决的问题
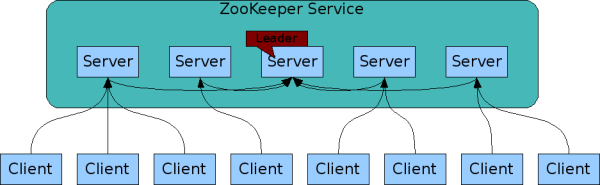
下文以YARN为例,描写叙述Zookeeper是怎样帮助YARN实现HA机制的
- 创建锁节点 全部的ResourceManager在启动的时候会竞争写一个/yarn-leader-election/pseudo-yarn-rm-cluster节点(暂时节点)。创建成功的ResourceManager节点变成Active节点,其它的切换为StandBy
- 注冊Watcher节点 全部的standby的ResourceManager节点会向/yarn-leader-election/pseudo-yarn-rm-cluster节点注冊一个Watcher
- 主备切换 当Active的ResourceManager节点出现异常或挂掉时。起在zookeeper上创建的暂时节点也会被删除。standy的ResourceManager节点检測到该节点发生变化时,会又一次发起竞争,直到产生一个Active节点
- 假设集群中存在两个ResourceManager节点RM1,RM2,在通过竞争操作后。RM1变成了Active后。假设某个时间段RM1因为资源损耗比較严重。产生了假死的现象。此时的zookeeper会以为RM1这台机器出现了故障。于是发起新一轮的竞选,选了RM2作为Active,在RM2变成Active后,RM1恢复了服务可是它任然以为自己是Active的,此时就出现了两个Active的情况。这样的情况又称为“脑裂”,为了解决这样的问题能够在创建根节点的时候引入ACL控制,这样的话当RM1恢复后尝试更新数据时,会发现相应的节点必须提供RM2的ACL信息才干够更新相应的数据
- 在Hadoop中负责解决该问题的组件是Hadoop-common 中的ActiveStandElector组件
Zookeeper使用
配置zoo.cfg
tickTime=2000 	# 心跳包
dataDir=/var/lib/zookeeper  #数据存放目录
clientPort=2181	#客户端连接端口
initLimit=5	# 初始化时可以允许的心跳数
syncLimit=2	# 发送与返回数据之间的最大时间差
server.1=centos1:2888:3888	#设置2888是用来和leader通信, 设置3888用来对leader选举
server.2=centos2:2888:3888
server.3=centos3:2888:3888
The entries of the form server.X list the servers that make up the ZooKeeper service. When the server starts up, it knows which server it is by looking for the file myid in the data directory. That file has the contains the server number, in ASCII.
启动
bin/zkServer.sh start
连接
$ bin/zkCli.sh -server 127.0.0.1:2181
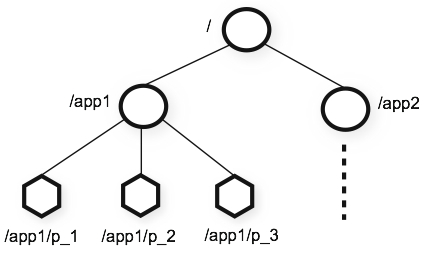
数据存放 Data model and the hierarchical namespace
The name space provided by ZooKeeper is much like that of a standard file system. A name is a sequence of path elements separated by a slash (/). Every node in ZooKeeper’s name space is identified by a path.
[zkshell: 0] help
ZooKeeper host:port cmd args
        get path [watch]
        ls path [watch]
        set path data [version]
        delquota [-n|-b] path
        quit
        printwatches on|off
        createpath data acl
        stat path [watch]
        listquota path
        history
        setAcl path acl
        getAcl path
        sync path
        redo cmdno
        addauth scheme auth
        delete path [version]
        setquota -n|-b val path
查看根节点
[zkshell: 8] ls /
[zookeeper]
创建子节点
[zkshell: 9] create /zk_test my_data  # 加一条数据 my_data
Created /zk_test
再次查看
[zkshell: 11] ls /
[zookeeper, zk_test]
获取数据
[zkshell: 12] get /zk_test
my_data
cZxid = 5
ctime = Fri Jun 05 13:57:06 PDT 2009
mZxid = 5
mtime = Fri Jun 05 13:57:06 PDT 2009
pZxid = 5
cversion = 0
dataVersion = 0
aclVersion = 0
ephemeralOwner = 0
dataLength = 7
numChildren = 0
赋值一下
[zkshell: 14] set /zk_test junk
cZxid = 5
ctime = Fri Jun 05 13:57:06 PDT 2009
mZxid = 6
mtime = Fri Jun 05 14:01:52 PDT 2009
pZxid = 5
cversion = 0
dataVersion = 1
aclVersion = 0
ephemeralOwner = 0
dataLength = 4
numChildren = 0
[zkshell: 15] get /zk_test
junk
cZxid = 5
ctime = Fri Jun 05 13:57:06 PDT 2009
mZxid = 6
mtime = Fri Jun 05 14:01:52 PDT 2009
pZxid = 5
cversion = 0
dataVersion = 1
aclVersion = 0
ephemeralOwner = 0
dataLength = 4
numChildren = 0
删除
[zkshell: 16] delete /zk_test
[zkshell: 17] ls /
[zookeeper]
[zkshell: 18]
Nodes and ephemeral nodes
ZooKeeper also has the notion of ephemeral nodes. These znodes exists as long as the session that created the znode is active. When the session ends the znode is deleted. Ephemeral nodes are useful when you want to implement [tbd].